


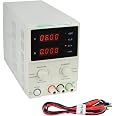
KORAD KD3005D - Precision Variable Adjustable 30V, 5A DC Linear Power Supply Digital Regulated Lab Grade…
Details
- Model NameKD3005D
- BrandKORAD
- Compatible DevicesPersonal
- Connector TypeBanana Jack AC
- Output Wattage300 Watts
- Form FactorStandalone
Description
⚡ Power Precision Meets Lab-Grade Reliability — Own the Voltage, Own the Moment
- COMPACT YET MIGHTY - Sleek metal design packs 150W power into a space-saving 14x10x10 inch frame
- EFFORTLESS MONITORING MODE - Automatic toggle between mA and A display keeps you in control without the hassle
- BUILT TO PROTECT YOUR PROJECTS - Robust circuit safeguards against overload, short circuit, and overheating
- PINPOINT ACCURACY AT YOUR FINGERTIPS - Dual 4-digit LED displays for crystal-clear voltage and current readings
- POWER FLEXIBILITY NO MATTER THE OUTLET - Seamless 110/220V input switching for global compatibility
The Korad KD3005D is a compact, metal-encased lab-grade DC linear power supply delivering up to 30V and 5A with 150W output. Featuring dual 4-digit LED displays and digital controls, it offers precise voltage and current regulation. Its automatic switching between mA and A display modes, combined with comprehensive circuit protection and dual voltage input (110/220V), makes it an essential tool for professionals demanding accuracy and safety in their electronic projects.


Specifications
| Manufacturer | Korad |
| Part Number | KD3005D |
| Item Weight | 9 pounds |
| Product Dimensions | 14 x 10 x 10 inches |
| Item model number | KD3005D |
| Is Discontinued By Manufacturer | No |
| Style | KD Series - 5 Amp |
| Material | Metal |
| Wattage | 150.00 |
| Item Package Quantity | 1 |
| Included Components | User Manual, Power Cord, 5 Amp Test Leads, KD3005D Power Supplu |
| Batteries Included? | No |
| Batteries Required? | No |
Have a Question? See What Others Asked
Reviews
A**E
Perfect home supply
I looked at a lot of supplies and bought this one based on the reviews. As a retired engineer, I'm used to using the high-end stuff, but $500+ is a little much for home use. The $30-$50 units seemed too cheap and the reviews certainly reflect that. The first thing I did when I got this was to pull the cover off. I was impressed with the assembly. Good practice was used. The cables are laced (always a good sign of care being taken), the transformer is huge and the heat sinking looks good. I don't have access to a schematic, so there is no way to evaluate the design, but the innards look great.The controls exceeded my expectations and are very easy to use. The voltage displays in units of .01V and current in units of .001A. Of course, the accuracy is not that good (and doesn't need to be) but you can tweak the settings easily for fine control as needed. To adjust either, just turn the knob. Pressing the knob changes which digit it's changing (10's of volts, 1's of volts, 0.1's of volts or 0.01's of volts). Ditto for current. Note that the knob clicks but it isn't always perfect. So, for instance, to change a setting on the fly, I may select the next unit down and come at the new setting by using 10 clicks instead of one.I'll describe how to use the supply in constant voltage mode. True constant current mode is rarely used, so I won't spend any time on that. To start out, unhook all the outputs. The GND terminal is nothing more than earth ground carried though from the AC line card. It is usually good practice to connect the ground to whatever is consider "common". (Yes, I know about ground loops and the need to sometimes avoid them, but for digital work that is rarely an issue). For most of what we do, common is the "-" post, so hook it to ground. This is easy to do by using some hookup wire and making a jumper using the holes in the posts that you see when you unscrew them a little ways. Now turn on the supply and set the voltage to what you need (for example, 5.0V). Adjust the current to something you think is perhaps twice the expected current needed. This will help protect your circuitry in case something is hooked up wrong.If you now press and hold the current knob until the OCP light comes on, you will set the supply to shut down if the current limit is exceeded. If you don't do this and too much current is being drawn, the supply will enter constant current mode and just reduce the voltage to whatever is needed to push out the current set by the current limit adjustment. If this is caused by an incorrect hookup, you may at this point be frying your circuit. OCP will help prevent that by shutting down the supply. You may still end up blowing something out, but the chances are less. If the supply shuts down, you can start it up again by just tweaking the voltage knob a bit. After things are set up, press and hold the voltage knob until the panel lock comes on. This will prevent anyone (such as little curious hands) from accidently changing your settings.The meters are dual purpose. When you are turning a knob, they show the voltage or current limit setting. After a moment, they go back to reading out the current and voltage being output from the supply.I haven't evaluated parameters like regulation, accuracy, ripple, etc. If I see anything unexpected I'll update this post. Just remember the meters are not accurate to 4 digits but are pretty good (better than 1%). There is utility in having more resolution than precision. For instance, you may want to look for small current changes. My hat's off to the designers for setting them up this way. It is useful if you understand the limitations.I think it is good practice not to push any low priced supply to the design limit. I bought the 5amp model with the intention of never using it to supply more than a few amps. Current is the killer for supplies and being conservative will help it last a long time, I hope.
J**R
Just what I needed
I purchased this to replace a big power supply I built back in the early 1970s. I loved my old supply, because I designed and built it, but mine was crude and didn't have any sort of display. This, of course, has displays for both voltage and current, and can be programmed so that a pre-programmed current is not exceeded.Some people seem confused about the way in which the current limiting works. There are two modes. The normal mode is for the unit to always limit the current to whatever amount you set. This is really great for things like testing LEDs because you can simply set the current limit to the nominal forward current specified for that LED, and you can then power the LED without bothering to hook up a current-limiting resistor. In this mode you can set the voltage to anything you like because the diode will present what amounts to a short circuit at any voltage above the forward voltage drop, so the current limit instantaneously kicks in and limits the current to, say, 20 mA (a typical LED current).The other current limit, which requires pressing and holding the current setting knob, acts like an actual circuit breaker. In this mode, if the current exceeds the threshold you've set, the voltage and current drop to zero and you have to reset the unit. I don't generally need something like this, but if your application requires circuit breaker protection, then this will be useful.The supply can be programmed so that you can set it by first pressing in the knob and then rotating each knob to change either the voltage or current. You can also program it so you don't first have to press the knob. As others have noted, it is easy to accidentally touch the knob and change the setting, so I liked the idea of having nothing happen if you rotate the knob without first pressing it to activated the setting mode. However, regardless of whether you set it to first require depressing the knob or not, you can press and hold the voltage knob for a few seconds and cause it to lock out the front panel so that you cannot possibly make a mistake by accidentally nudging the knobs.One thing that I do to provide an extra guarantee that I won't hurt something by nudging the knobs is that when I'm finished setting the supply, I always press the knob multiple times until I am controlling the least-significant digit. That way, if the knob does get changed, I will probably only affect the setting by a few hundredths of a volt or amp.I have done many projects in the month since I purchased this supply and my only regret is that I didn't get one that is a little more powerful. I was fixing a simple power inverter (used to generate 110V from a 12V car accessory plug). After I fixed it, I wanted to test it out so I plugged in a 40W 110V incandescent light bulb, but it wouldn't light. I then did a quick Ohm's law calculation and realized that 40W was right on the edge of what could be powered, especially since there is some loss through the inverter.But, other than that, I have been 100% satisfied with my purchase.
Common Questions
Trustpilot
2 months ago
1 week ago
